Your cart is currently empty!
Observium RADIUS Multi-Factor Authentication with Cisco Duo and ISE
Published by
on

In this article we will learn how the network monitoring platform, Observium can be configured to authenticate users remotely using RADIUS, Cisco Duo and Cisco ISE.
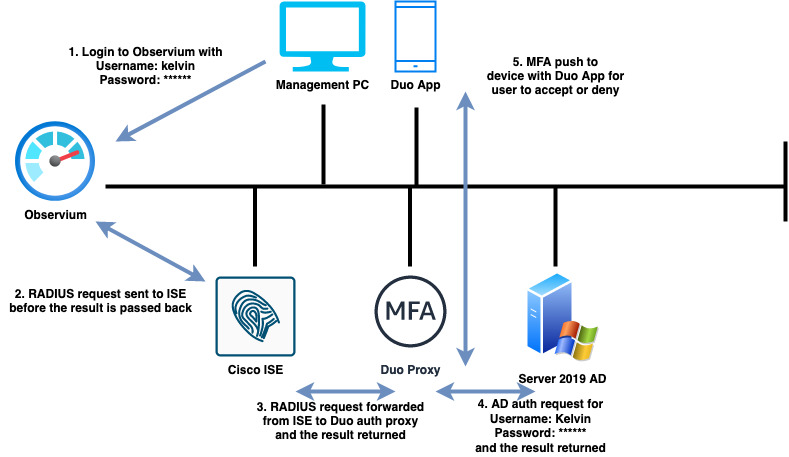
When a user attempts to access the Observium GUI with their credentials (Username and Password), a RADIUS request will be sent to Cisco ISE. ISE will then forward the RADIUS request onto the Cisco Duo authentication proxy which will then query the external identity source (Active Directory) and prompt the user to confirm their authentication attempt using the Duo application before access is determined.
Technology used in this demonstration
- Cisco ISE 2.6
- Observium
- Cisco Duo
- Microsoft Server 2019 (Active Directory Domain Controller with Cisco Duo Auth Proxy)
- Android device enrolled with Cisco Duo
Assumption
This demonstration assumes that those wishing to follow along already have the above technologies configured and operational. The configuration steps are shown for Observium and the Duo authentication proxy.
Topology

The topology above highlights the authentication process.
Configure Observium
When Observium is deployed, local authentication is configured by default and therefore needs changing via the CLI. Access the CLI as a root user and enter the following configuration.
Note: Where config[‘auth_radius_server’] = array(‘192.168.100.2’); enter your Cisco ISE IP address
cd opt/observium/
nano config.php

// Authentication Model
$config['auth_mechanism'] = "radius";

//RADIUS config
$config['auth_radius_server']  = array('192.168.100.2');
$config['auth_radius_port']    = 1812;
$config['auth_radius_secret']  = 'secretkeyhere';
$config['auth_radius_timeout'] = 60;
$config['auth_radius_retries'] = 2;
$config['auth_radius_id']      = '';
$config['auth_radius_method']  = 'pap';
Cisco Duo Configuration
Install the Cisco ISE Radius application and configure a suitable policy for the application. In Cisco Duo navigate to Applications > Protect an Application and find Cisco ISE RADIUS. When you’ve found the application, click ‘Protect’. You can also follow the documented steps by clicking on the ‘Documentation’ link next to the application.

Install the Duo Authentication Proxy
In order to add MFA to the authentication process the Duo authentication proxy needs to be installed within your environment. Please review the ‘Documentation’ link for instructions on how to download the authentication proxy and install it on a suitable machine within your environment.
Once installed, add the following configuration to the ‘authproxy.cfg’ file with administrator privileges before saving the file.
Note: Where <> remove and add your environment specific details. Where ikey, skey and api_host, add your details taken from the Duo application.
; Complete documentation about the Duo Auth Proxy can be found here:
; https://duo.com/docs/authproxy_reference

; NOTE: After any changes are made to this file the Duo Authentication Proxy
; must be restarted for those changes to take effect.

; MAIN: Include this section to specify global configuration options.
; Reference: https://duo.com/docs/authproxy_reference#main-section
;[main]


; CLIENTS: Include one or more of the following configuration sections.
; To configure more than one client configuration of the same type, append a
; number to the section name (e.g. [ad_client2])

[ad_client]
host=<ad ip address or hostname here>
service_account_username=<AD admin username>
service_account_password=<AD admin password>
search_dn=<Enter search DN here, for example: DC=networkwizkid,DC=com>


; SERVERS: Include one or more of the following configuration sections.
; To configure more than one server configuration of the same type, append a
; number to the section name (e.g. radius_server_auto1, radius_server_auto2)

[radius_server_auto]
ikey=
skey=
api_host=
radius_ip_1=<ISE Server IP address here>
radius_secret_1=<RADIUS Shared secret (same as in ISE)>
failmode=safe
client=ad_client
port=1812
Configure Cisco ISE
With access to the Cisco ISE GUI navigate to the following location as shown in the screenshot below and enter the details of your Duo Auth proxy.

Navigate to the following location as shown in the screenshot to configure a RADIUS server sequence.

Configure an authentication policy that will match Duo server sequence that was just created.

Testing
You should now be ready to test authentication to Observium now. Login to Observium and monitor the RADIUS live logs within Cisco ISE. You should receive a result similar to the one shown in the screenshots below.


Other Useful Links
https://docs.observium.org/authentication/#radius-authentication


Leave a Reply