In this article we will take a look at how to migrate Cisco Adaptive Security Appliance (ASA) configuration to Firepower configuration using the Firepower migration tool. The migration tool can be used to migrate from a number of different vendor firewalls however, in this article we will focus on the migration from ASA’s to Firepower Threat Defense (FTD) firewalls.
Demonstration Setup
The following setup has been used for this demonstration:
- Cisco Adaptive Security Appliance (ASAv) 9.13(1)
- Firepower Management Centre Virtual (FMCv) 6.5.0
- Firepower Threat Defence Virtual (FTDv) 6.5.0
- Microsoft Windows Server 2019
- Firepower Migration Tool 2.3.3
Pre-Requisites
Before migration activities are performed you should consult the Cisco documentation for more information on guidelines and limitations when using the migration tool. Below is a summary of some of the things that should be taken into consideration before proceeding with a migration.
Please refer to the Cisco documentation for more information.
- Ensure that both firewalls are supported by the migration tool
- Ensure the FMC is supported by the migration tool
- Ensure that the the limitations are understood
- Download the Firepower Migration Tool
- Can only be run on Windows 10 64-bit or MacOS 10.13+
- Google Chrome set as a default browser
- Host machine set not to sleep (This can affect migrations)
Prepare the FMC
When migrating configuration to the FTD’s, the migration tool communicates and pushes all migrated configuration to the FMC and not the FTD. Before we can communicate with the FMC the Rest API interface needs to be enabled.
- To enabled the Rest API interface, access the FMC GUI and navigate to System > Configuration > Rest API Preferences > Enable Rest API and select the to enable

Note: Where High-Availability (HA) is to be configured for FTD devices, this must be done once the configuration migration has taken place. The migration tool will not allow you to migrate configuration to FTD’s configured in HA. Break the HA of any FTD devices before proceeding! The same is true for devices in a cluster.
Note: If FTD’s are currently configured with device-specific configuration such as (but not limited to) interfaces and routes, once the ASA migration is complete, any existing configuration will be overwritten. Futhermore, ensure that the interfaces are not used in exisitng policies or the migration tool will fail to complete.
ASA Configuration Preperation
The ASA configuration file must satisfy certain requirements before it can be processed by the migration tool; these requirements are:
- The configuration file must include the ASA version number
- The configuration must be valid and error free
- When saving the configuration file, ensure it is saved as file type .txt. or .cfg
- If the configuration file has been modified manually, test the configuration on the ASA to ensure that the configuration is valid before proceeding
- If configuration has been gathered via logging of the terminal, ensure that the syntax ‘–More–‘ has been removed
Note: The migration tool has limitation and not all configuration can be automatically migrated using the tool. Please consult the Cisco documentation for more information. Highlighted below are some of the key points to keep in mind when prepare configuration for migration:
- Dynamic routing and VPN configuration cannot be migrated using the tool and therefore needs to be done manually
- Routed mode Bridge Virtual Interfaces (BVI), redundant interfaces and tunneled interfaces cannot be migrated with the exception of transparent mode BVI interfaces
- Nested object-groups and/or port groups will be expanded when run through the migration tool as they are not supported on the FTD
Carrying-out the ASA to FTD Migration
- Open the Firepower Migration Tool. A script will run before opening the browser where you will be presented with the End User License Agreement. Read and accept the agreement and proceed.


- Enter your credentials and once logged-in you should be presented with the screen that is used to start the migration. Select the source of the configuration (ASA device version) and click ‘Start Migration’.


- Select your prefered method of pulling the ASA configuration. In this demonstration the manual option has been used. If you prefer to connect to the ASA from the migration tool you will need to ensure that the device is reachable.

- The migration tool will parse the configuration and output a summary of the results. If happy, click next to proceed to the next step.

- Input the IP address of the FMC and press connect.

- Input the required username and password to proceed.

- Once connected, proceed and select the FTD device that the ASA configuration will be migrated to. You will also have the option NOT to select an FTD but doing so will mean interfaces and routes will NOT be migrated. In this demonstration an FTD has been selected.


- Select the features that you would like to migrate and proceed.
- Note: If the option ‘Populate destination security zones’ is selected, zones will only be created if the access-group is not using ‘global’. If ‘global’ is used then the conversation will set the destination zone to ‘any’.

- Proceed with the conversion.

- The migration tool with parse the data and report back any issues (if any). At this stage you can also download the pre-migration report, this is strongly advised for audit purposes. If satisfied with the results once parsed, proceed onto the next step ‘Map FTD Interface’.


- Map the ASA interfaces to the FTD interfaces.

- Map the interfaces to the security zones and interface groups on the FTD. If these do not exist you can either auto-create them or add them manually. These can be modified/delete once the migration is complete. Once complete, move onto the next step.

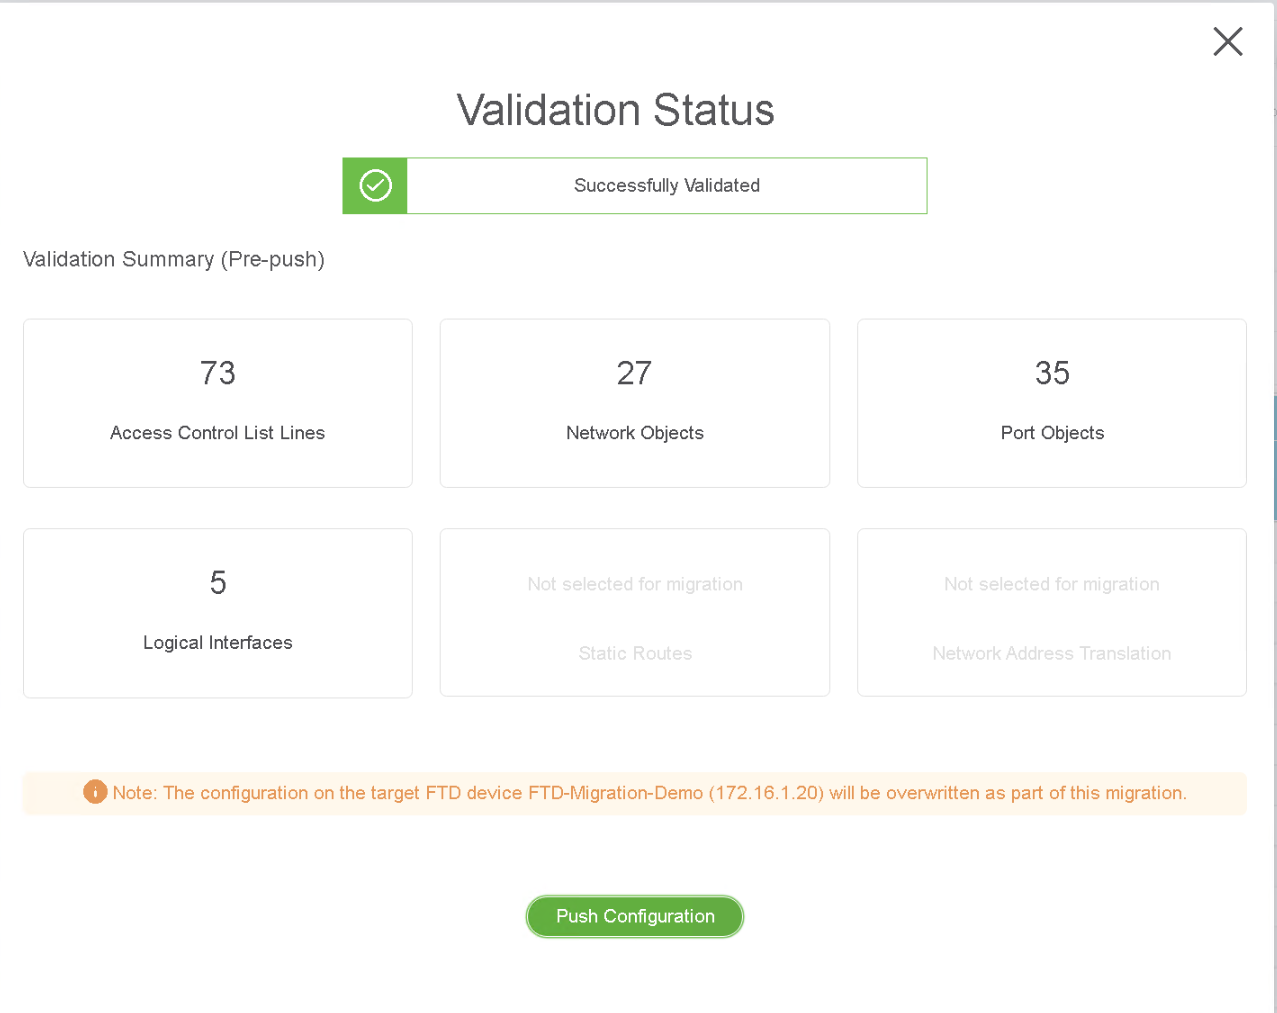
- It is now time to review and validate the configuration before it is all migrated to the FMC and pushed to the selected FTD. In this step there are a few options; depending on your preference you may want to spend some time making modifications. When you are happy, click validate to proceed.

- The validation status page will appear and provide the information of the configuration that will be migrated. Press ‘Push Configuration’ to proceed.

- The configuration migration will now start. The migration tool will show you the current status however, if you would like to see the tasks being performed, you can maximise the command-prompt of the migration tool.

- Once the migration is complete and the configuration has been pushed to the FMC you can download the post-migration migration report. You will also now need to push the configuration the the FTD by accessing the FMC.

- With access to the FMC, the migrated configuration and changes that will be applied to the FTD device can be seen by clicking ‘Deploy’. Proceed with the push of the configuration to the FTD device.
Once deployed, the migration is complete.


Leave a Reply